How to Build a Crust: Breading, Coating and Crusting Techniques Explained
# How to Build a Crust: Breading, Coating and Crusting Techniques Explained
That satisfying crunch when you bite through a perfectly golden piece of chicken or fish — it's one of the most universally loved textures in food. But getting that crust right is where a lot of home cooks quietly struggle, ending up with coating that falls off, burns, or stays disappointingly soggy.
The good news is that breading and crusting follow consistent, learnable logic. Once you understand what's actually happening at each stage, you can apply it across dozens of dishes — and stop guessing.
Why Coatings Fail (And What's Actually Going On)
Most coating failures come down to one of three things: the surface isn't dry enough, there's nothing for the coating to grip, or the fat isn't hot enough when the food goes in.
Coatings work by forming a physical barrier around the food. When that barrier hits hot fat or a hot oven surface, moisture inside the food turns to steam, which escapes through tiny gaps in the crust. Meanwhile, the outer layer dehydrates rapidly and browns through the Maillard reaction — the chemical process responsible for that deep, complex golden flavour. If any part of this chain breaks down, the crust suffers.
Understanding this tells you something immediately useful: a soggy, pale crust usually means the temperature was too low, and coating that slides off usually means the surface preparation was skipped or rushed.
The Standard Breading Process (And Why Each Step Matters)
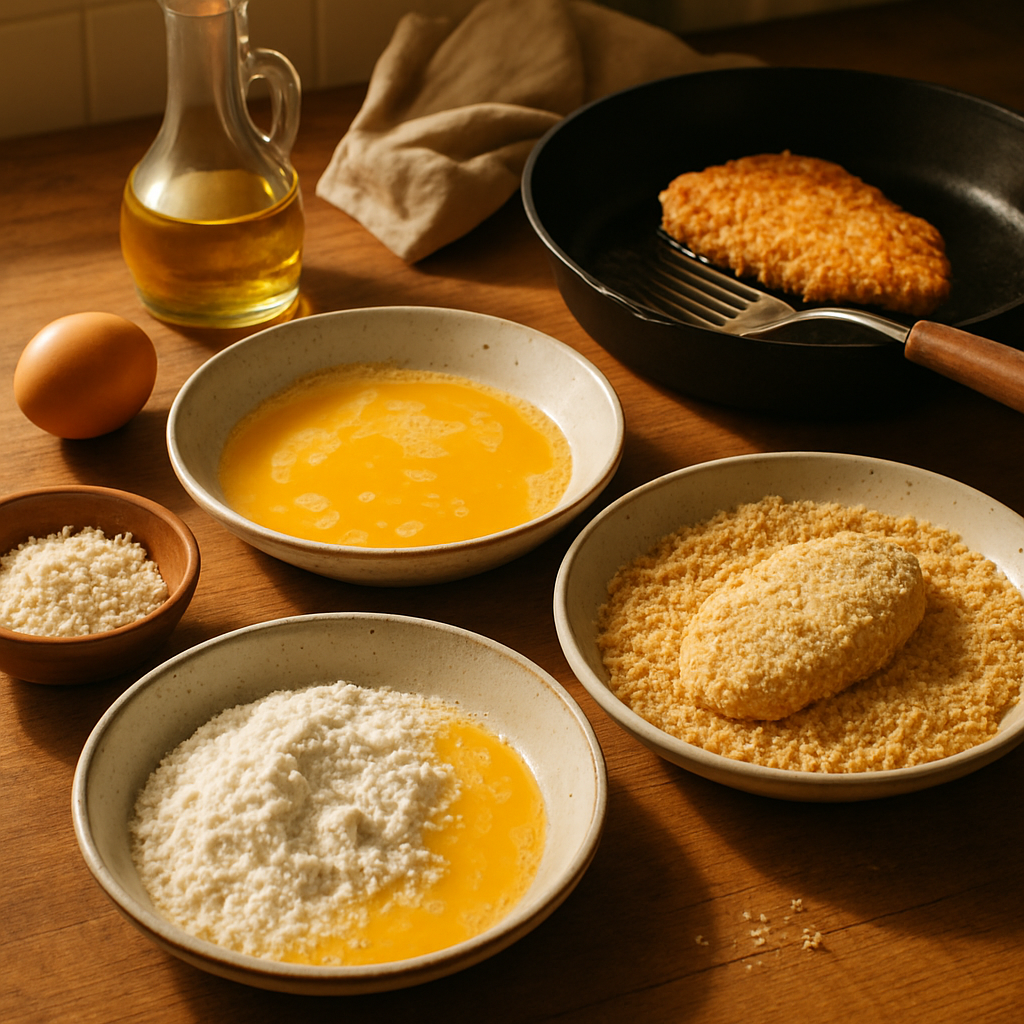
The classic three-stage breading — flour, egg wash, breadcrumbs — exists for good reason. Each layer does a specific job.
Stage one: flour. Patting your protein dry and then dusting it in plain flour creates a thin, slightly rough surface. Moisture on the food's surface would otherwise prevent the egg from adhering properly. The flour gives the egg something to cling to.
Stage two: egg wash. Beaten egg (sometimes mixed with a little milk or water) acts as a glue between the flour layer and the outer coating. The proteins in the egg set quickly in heat, helping lock the whole structure together. For a richer result, use just yolks; for something slightly lighter, you can thin it with a splash of water.
Stage three: breadcrumbs. This is your outer crust, and the texture of your crumbs makes a real difference. Fine dried breadcrumbs give a smooth, even coating. Panko — the Japanese-style breadcrumb with a larger, airier flake — creates a dramatically crunchier result because of the increased surface area. Fresh breadcrumbs sit between the two: softer initially, but they brown well and have a slightly more rustic feel.
One often-skipped step: after applying your final coating, let the breaded food rest on a rack for five to ten minutes before cooking. This helps the layers bond and reduces the chance of the coating sliding off.
Going Beyond Breadcrumbs
Breadcrumbs are just the start. Once you understand the structure — something to help adhesion, something to form the crust — you can swap in almost anything for that final layer.
Crushed cornflakes give an aggressive crunch and work brilliantly on baked chicken. Panko mixed with grated parmesan adds depth and richness. Ground nuts — almonds, hazelnuts, pistachios — create a denser, nuttier crust that works particularly well with fish. Sesame seeds applied with an egg wash give an attractive, slightly chewy exterior on chicken or tofu.
For a gluten-free approach, polenta (fine or medium ground) creates a genuinely satisfying crust, particularly for fish and halloumi. Desiccated coconut pressed onto prawns or chicken strips before baking gives something almost restaurant-quality with very little effort.
The key is keeping your proportions sensible — if the coating is too thick, it overwhelms the food inside and can end up tasting mainly of crust.
Wet Batters: A Different Approach Entirely
Batters — think tempura, beer batter, or a simple flour-and-water mix — work differently from dry breading. Rather than building up discrete layers, a batter coats the food in a single wet layer that sets and crisps in hot fat.
Tempura batter is worth understanding because it's one of the most effective examples. It uses very cold water (sometimes sparkling water or even ice water) and is mixed minimally — lumps are fine. The cold temperature slows gluten development, and the carbonation adds extra lightness. The result is a thin, almost translucent crust that's shatteringly crisp.
Beer batter works on similar principles: the carbonation in the beer creates air bubbles that keep the batter light, and the slight bitterness of the beer complements fatty fish particularly well. Temperature still matters — your oil needs to be around 180°C for a batter to set before it absorbs too much fat and turns greasy.
Wet batters generally need to go straight from coating to oil — they don't benefit from resting the way dry breadings do.
What the Evidence Shows
From a nutritional standpoint, coatings do affect the overall profile of a dish — but often less dramatically than people assume. The main variables are the fat used, the cooking method, and the thickness of the coating.
Research into frying consistently shows that oil temperature is the single biggest factor in how much fat a coating absorbs. Food fried at the correct temperature (typically 170–185°C) absorbs significantly less oil than food fried at too low a temperature, where the coating has time to become saturated before it sets. In practical terms, a properly fried piece of fish in a light batter can contain less fat than a pan-fried piece cooked in an excess of butter at too low a heat.
Baking coated foods on a wire rack (rather than directly on a tray) allows hot air to circulate underneath, which mimics some of the effect of frying without submerging the food in oil. The crust won't be identical, but it comes remarkably close — especially when you brush or spray the coating lightly with oil before it goes into the oven.
Coating thickness also matters for satiety. A substantial crust adds volume and texture, both of which contribute to feeling full. This is partly why battered fish alongside proper chips feels more satisfying than the same weight of plain poached fish.
Oven vs. Pan vs. Deep Fry: Choosing Your Method
Each cooking method has genuine strengths, and the right choice depends on what you're making and what result you're after.
Pan frying gives excellent colour and flavour, but you need enough fat to come at least a third of the way up the food. Too little fat and the sides steam rather than fry. Flipping at the right moment — when the coating releases naturally from the pan rather than being forced — makes a significant difference to how intact the crust stays.
Deep frying gives the most even, consistent result for anything with a wet batter, because the food is fully surrounded by hot fat. It's not something most people do every day at home, but it's worth understanding that done correctly, it's a precise and effective cooking method.
Oven baking works well for thicker coatings like panko-crusted chicken or fish. The keys are a hot oven (200–220°C), a wire rack if possible, and a light coat of oil on the surface of the breading. Don't skip preheating your tray — a hot surface from the start helps the bottom of the crust begin crisping immediately.
Practical Takeaways: Getting It Right Every Time
Here's what actually moves the needle:
- Dry your food before you start. Pat protein dry with kitchen paper. Moisture is the enemy of adhesion.
- Season every layer. Add salt and pepper to your flour, your egg wash, and your crumbs. Seasoning only the outside leaves the interior bland.
- Let breaded food rest before cooking. Even five minutes helps the coating set.
- Don't crowd the pan or tray. Overcrowding drops the temperature and creates steam, which softens the crust.
- Resist the urge to move it. Whether frying or baking, leave the food alone until it's ready to release naturally.
- Cool on a rack, not a plate. Setting coated food on a flat surface traps steam and softens the bottom of the crust.
These aren't complicated steps — but applying all of them at once is what separates a crust that stays crisp from one that disappoints.
---
If you want meal plans built around recipes like these — with the macros already worked out — Macrology generates macro-perfect meal plans in seconds — https://macrology.app/signin
Want meals like this planned to your exact macros?
Macrology generates a personalised meal plan in seconds — breakfast, lunch, dinner and snacks, all hitting your daily targets.
Start your free 14-day trial